
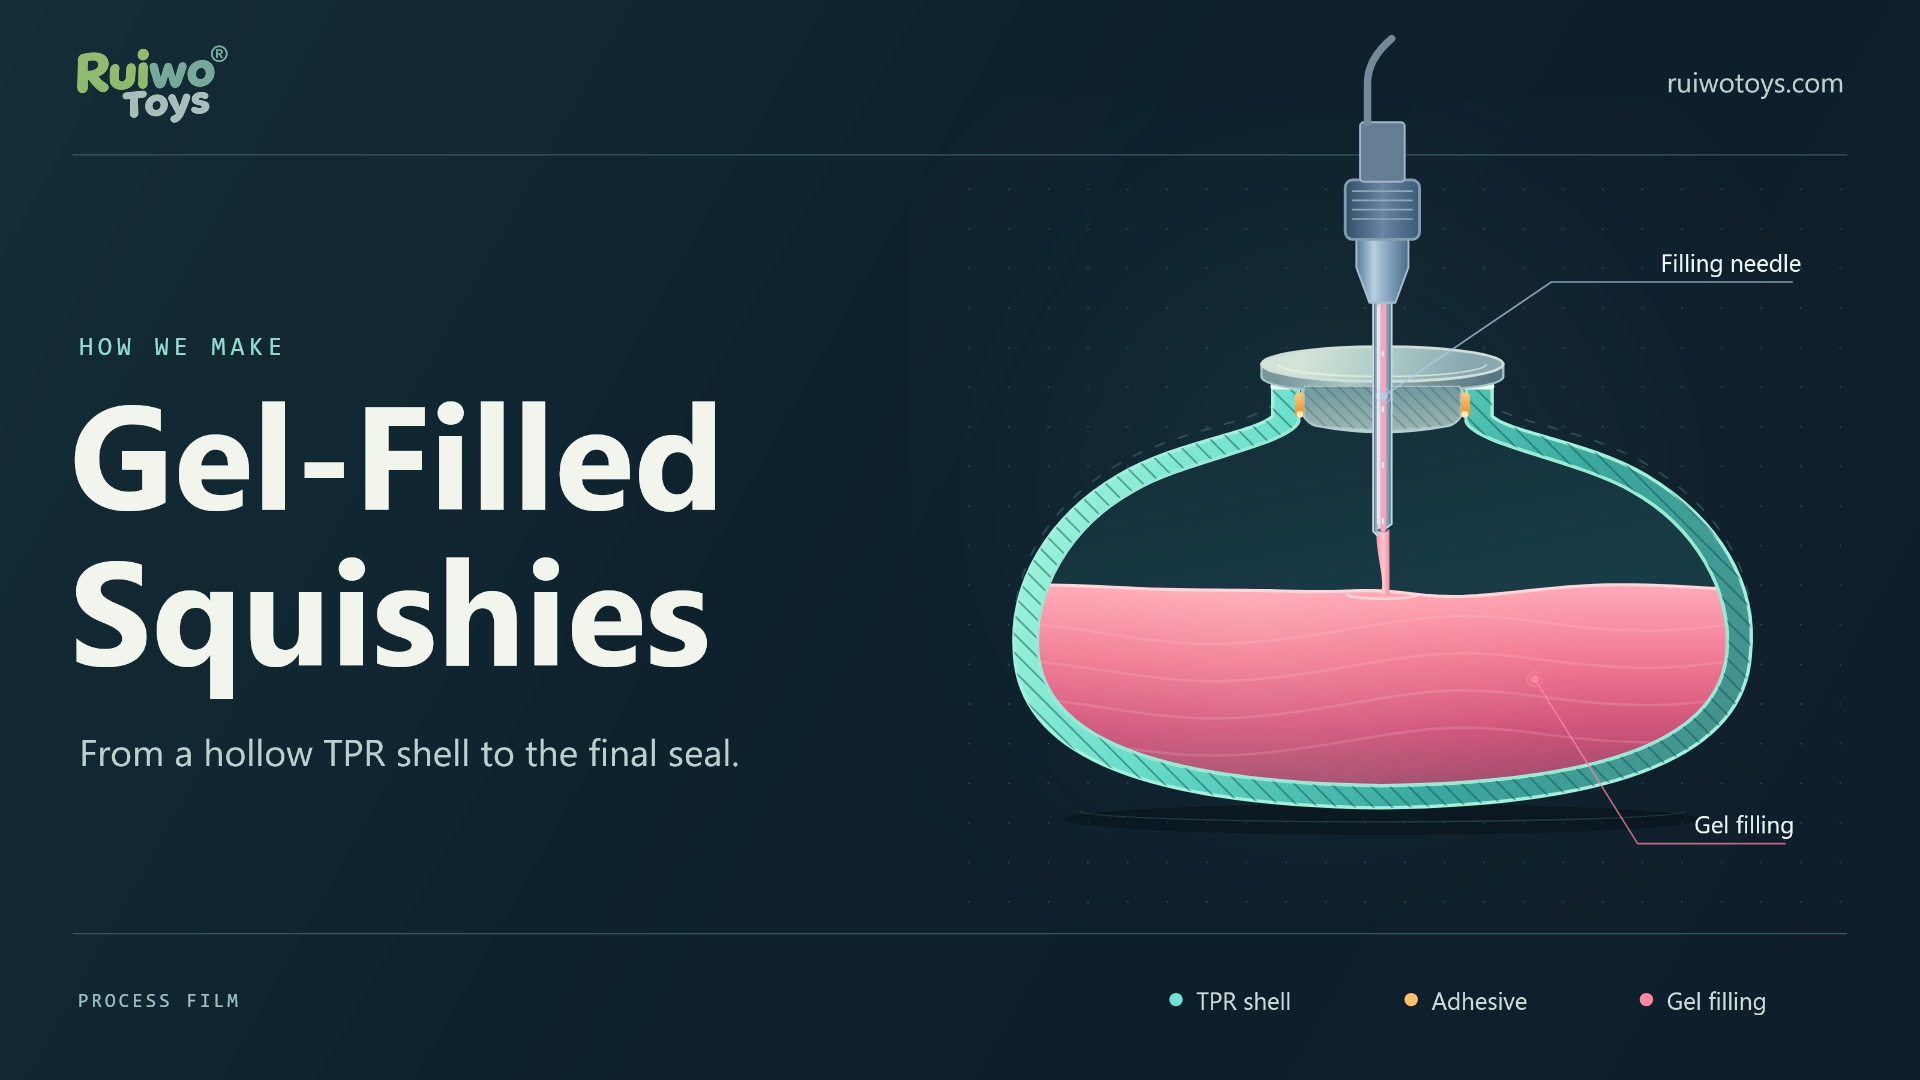
The plug is already in place when a Ruiwo gel-filled squishy reaches the filling station. The toy is still empty. To get the gel inside, we pass a filling needle through the plug, dispense the gel, then withdraw the needle and seal the small hole it leaves.
On this page
Why seal it twice? The first seal bonds the plug to the shell. The second closes the needle hole in the plug itself. If you are checking a wholesale sample for leaks, those are two different places to look.
Watch the plug during filling
In our 1-minute-23-second cutaway animation, gold marks the adhesive and pink marks the gel. At 0:31, the coated plug lines up with the empty shell. At 0:52, gel begins flowing from the needle tip. At 1:10, the needle is out and the adhesive nozzle moves toward the puncture.
How the hollow TPR shell is molded
TPR stands for thermoplastic rubber. Pellets enter the heated barrel of an injection molding machine, where a screw moves the softened material forward. Inside the closed mold, the outer cavity defines the toy’s shape. A core occupies the space that will later hold the gel. The rubber fills the narrow gap between the two and cools into a flexible wall.
When the mold opens, the shell comes off the core with a wide opening for the plug. At this point it has its outline, but none of the weight or movement that comes from the filling.
First seal: glue the plug rim while the shell is empty
The plug is a separate part. We apply a continuous ring of adhesive to the surface around its outer edge, where it will touch the rim of the shell. We then align the plug with the opening and press it into place.
Doing this before filling keeps the gel away from the surfaces being joined. The distinction is easiest to see in the cutaway: the gold adhesive sits between the plug and the rim. The middle of the plug is still accessible to the filling needle.
How the gel gets through the seated plug
The plug stays in place. A filling needle passes through its center until the tip is inside the hollow shell. Only then does the machine dispense a measured amount of gel. Filling the toy this way leaves the bonded rim undisturbed.
In the cutaway, the gel spreads across the bottom first. As more enters, the soft walls fill out around it. That movement also explains the feel of the finished toy: press one side and the gel shifts toward an area where the shell can bulge.
Second seal: stop the flow, withdraw the needle and close the hole
Once the measured dose is in, we stop the flow and pull the needle all the way out. A small puncture remains in the face of the plug. We place one drop of sealing adhesive directly over that spot. Adding more adhesive around the outer rim would miss the hole the needle just made.
After the adhesive has set, a squeeze check puts the closure under pressure. Inspect the circular joint and the small central seal separately. A neat-looking rim tells you little about whether gel can escape through the puncture.
How to check a wholesale sample for leaks
Start with a dry sample and keep its original retail packaging. Note any marks before the first squeeze so you can tell whether fresh residue appears during handling.
| Where to look | What to do | What to record |
|---|---|---|
| Around the plug | Squeeze the body normally, release it and look around the full rim under good light. | Any edge that lifts, or a fresh wet line along the joint. |
| At the needle hole | Use a fresh corner of a dry white tissue to blot the center of the plug after squeezing. | Any new spot on the tissue. Use a different corner for the rim so you can tell the two apart. |
| Inside the retail pack | Put the sample back in its intended bag or tray. Check where the pack rests against the closure. | The contact point and any fresh transfer to the pack. Keep the pack with the sample if you report a problem. |
A useful inspection note might read: “After squeezing, a fresh spot appeared at the center of the plug; the rim stayed dry.” Add the SKU and a close-up photo. Before a bulk run, agree on the handling conditions, sample quantity and acceptance criteria for that design. A dry spot check on one piece does not establish performance for a whole shipment.
Questions wholesale buyers ask
Does a small dot on the plug mean the toy has leaked?
The finished plug can have a visible dot of cured adhesive where the needle entered. Its presence alone does not indicate a leak. Compare it before and after handling; fresh wet material at the dot is a reason to set that sample aside for review.
Do all TPR squishy toys use a needle-filled plug?
No. TPR identifies the outer material. For example, a toy with a TPR skin can contain flour rather than gel. The sequence above applies to the gel-filled construction shown in our animation. Our guide to how filled squishy toys are made covers other constructions, and our slush-style squishy sample guide compares how different fillings move when squeezed.
What should I request before placing a bulk order?
Choose a style from our wholesale TPR squishy collection, then ask for that exact SKU in the retail pack you intend to use. Ask the supplier to identify the filling and show the closure in a close-up. Wholesale pricing and minimums depend on the selected item; a price break is not a sample minimum. To request a sample or wholesale quote, send the product reference, quantity, destination and packaging preference.


